December 16, 2010

Santa Cutie!

Here's another version of a Santa Cupcake. It's easy to make, so don't be shy! I'm sure you can find the santa heads online or  a cake supply shop.


Here's a finished version of 8 cupcakes around a 4" cake.


Happy Decorating!!

December 13, 2010

Sweet Snowman

Who doesn't love snowmen?? Here's a quick and easy snowman cupcake for the holidays, or all winter long!


Happy Frosting!!!

December 10, 2010

Gingerbread Man

Quick and easy, here's how to make an adorable gingerbread man cupcake. Remember, this face can go on anything round!


Hope you enjoy!

December 1, 2010

Christmas is Coming!!!

What's not to love about it? The anticipation of the kids, people try to be a little nicer (but I think they should try harder!) Christmas tree lights, music - love it all!

Santa can be made into a cake, cookie, cupcake, whatever you like that's round! Give him a whirl, you won't be disappoited and your party guests or kids will love him!


Have fun and enjoy the jolly red guy!

November 24, 2010

Dessert Anyone?

I saved dessert for last! Pumpkin Pie anyone???


Start off with a smooth, plain white iced cupcake. I airbrushed it orange.


Then I added a thin coat of golden brown airbrush. You can't tell too much from the picture, but it gives it a nice pumpkin pie color.

Next, with a leaf tip and golden brown icing, pipe a border with the exact same motion as your shell border, but with a leaf tip. It makes a nice rim for the pie crust.


Lastly, with your #20 shell tip and the same golden brown icing, pipe a dollop in the middle.


Fun to make all flavors of pies! You could add some fall color sugar sprinkles too! Enjoy!

Indian Cupcake

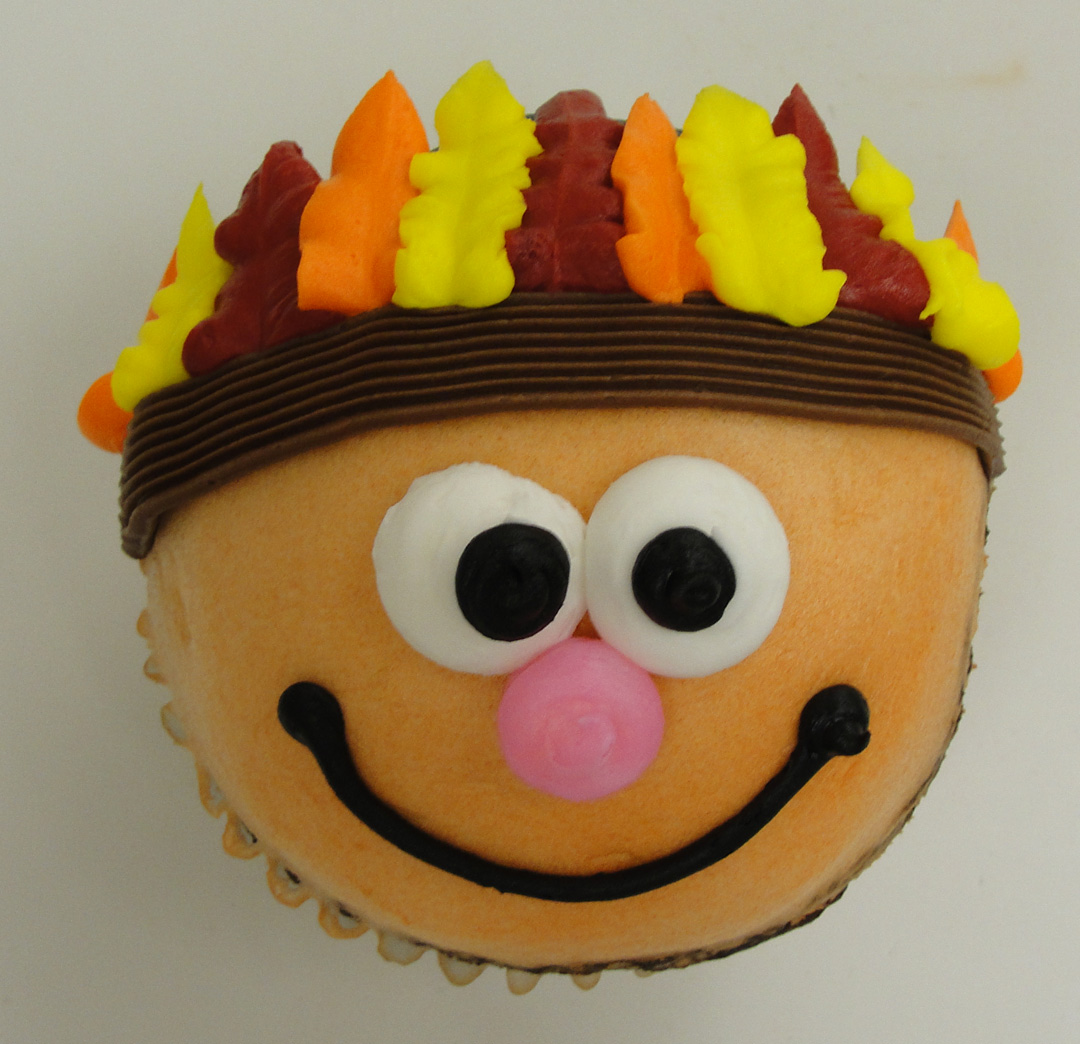
What would Thanksgiving be without Pilgrims and Indians?? The pilgrim didn't turn out for me, but the Indian did! Here's what I came up with:


Take your plain, very smooth, white iced cupcake. I airbrushed the whole thing with a light peach/flesh tone. Then I airbrushed a small amount of black at the top (kind of for the hair).


Then with the basketweave tip and chocolate icing, pipe a strip at the top of the hairline.


Then, with a #5 round tip and white icing, pipe the rounds for the eyes.


Next, with a #4 round tip and pink icing, pipe the round for the nose.


Next, with a #3 round and black icing, pipe the pupils of the eyes and the mouth.


Next, with a leaf tip and red icing - start at the top of the brown rim and go up. Pipe on 3 red leaves (feathers).


Next, with the same leaf tip and orange icing, pipe an orange leaf next to all the red ones.


Then, with another leaf tip and yellow icing, fill in all the remaining spaces.


Lastly, take a #3 round tip and yellow icing and pipe some X's across the brown band.


Too cute, right??

Turkey No. 2

Here's Turkey No. 2. He's very quick and easy to make.


Start off with your cupcake. Ice it white and roll it smooth. I sprayed it with ivory shimmer airbrush. Be sure to let the airbrush dry before you continue to decorate! Or....


Your icing will slide around, just like this. Thank you for noticing
I messed up! ha!ha!
Use a #3 round tip and orange icing. Draw on the five tail feathers.


Then with a #7 round tip and chocolate icing, Pipe a large round for the body and a smaller one for the head.


Lastly, with a #3 tip and dark green icing, pipe a zig-zag under the turkey for grass and put on a few sprinkles.


That's it! Quick and easy-give them a whirl!

It's Turkey Time!

My goodness! The days are ticking until the Jolly Red Guy makes his appearance! I figured I'd better hurry and get the turkey's posted!

Here's Turkey #1


Start off with your cupcake and ice it with chocolate icing. It doesn't have to be perfectly smooth because you won't see most of it.


Then use a golden brown icing and a #6 round tip and pipe the head and neck on the left side of the cupcake.


Next, add some candy corn for the tail. You can put on one layer, two or three.


Then, take a #4 round tip and red icing, and pipe the squiggle for the wattle.


Lastly, with a #3 round tip and dark green icing, pipe the eye and draw the wing. With a #3 round tip and brown icing pipe a triangle on for the beak.

There you have it! Quick and Easy.

October 31, 2010

Happy Halloween!!!!!

I saved the best monster cupcake for last! What fun it was creating all these 13 monsters of Halloween cupcakes! I really hope you enjoyed them and give a try making them!

I can't take credit for this one, I found it on the complete cupcake and thought it was adorable!

These are the tips I used for this fabulous monster: No. 3 round and No. 10 round.


I started with the neon green icing and a coupler in the bag. Pipe a ring around the outside edge of the cupcake.


Then I piped a large ball of icing in the center and put on the plastic eye pick. You could pipe the eye with black and white icing also and draw the red lines on with red gel.  Then I piped the line around the top of the eye (all with just the coupler).


Next, with the No. 10 round and the neon green icing, start piping the tenticals. It's the same motion as piping the teeth, (squeeze and pull) just larger. You can wiggle them out, or keep them straight.


Continue around the eye, until the entire cupcake has tenticals, and it looks cool!


With the black icing, and No. 3 round tip, pipe the eyebrow. Eyelashes would be cute too with the grass tip.


Then with the No. 3 round tip and gold icing, pipe the suction cups onto the tenticals. There you go-nothing to it!


Here's the side view. Yes, it has alot of icing on it! All the better to eat you with my pretty!!!


The kids will love making these. Switch up your colors and HAVE FUN!

October 30, 2010

Day 12: One-Eyed Monster Cupcake

We just finished carving our 'monsterous' pumpkins and finalizing the details of the zombie costumes for tomorrow night. What's not to love about shamelessly gorging yourself on your kids' candy?? "What candy bar?" "The dog must of ate it!", the list goes on and on!! I believe Halloween is an adult holiday, the one day a year WE get to remember what it's like to be a kid!

I'm saving my best monsters for last, so give this one a whirl. Change up the colors-they're cute!


These are the tips I used: a No. 3 round and a No. 10 round.


I started with a plain white iced cupcake, smoothed it with the "roller" and airbrushed it a metallic turquoise. You can use ANY color combination for this one, it's pretty endless.

With the No. 10 round and white icing, pipe one great big eye in the middle of the cupcake.


Next, with the No. 3 round and black icing, pipe the round for the pupil and draw on the mouth.


Next, with a No. 3 round and orange icing, give him chicken pox!


Then with the No. 3 round and white icing, pipe on his teeth. Squeeze and pull.


Lastly, a pair of horns, the same as the devil cupcake. Made from fondant and airbrushed orange. You can mix the color directly into the fondant also, but use rubber gloves, it can get messy.


And there you have one cute monster cupcake! Hopefully you're all dusting off your treat bags. Come back tomorrow for my  'saved the best for last' monster cupcake!